Monday, June 30, 2014

Bako National Park, Kuching-Part 1

This took place exactly a month ago during the Gawai Dayak Holiday. Gawai Dayak is a festival celebrated by the Dayaks (Ibans and Bidayuhs) in Sarawak every year on the 1st of June. Read more about Gawai Dayak here.

This year it falls on a Sunday, so we got 2 extra off days on Monday and Tuesday. Since it coincided with the boys' school holidays, we decided to head for Bako National Park (Bako NP). The Park is one of the nearest national parks to Kuching.

It is only about 45 minutes drive from home to Kampung Bako, the gateway to Bako NP and where the Bako NP Terminal is located. From Kampung Bako, we chartered a boat which took about 30 minutes to reach the Park's head quarter.

On the Way to Bako National Park
Bako National Park Terminal - WireBliss
Bako National Park Terminal at Kampung Bako.
Paid for the entrance fee and chartered boat here.
Stuff to bring to Bako National Park Terminal - WireBliss
Our stuff - mostly food stuff :)
At the Terminal Bako National Park Terminal - WireBliss
Henry at the boat jetty/terminal.
This will be his first time on a boat.
Several times we were here before, we just stopped by
to look at the tourists and boats.
Wondering when we would finally take them for a trip....haha
Bako National Park -Chartered boat- WireBliss
Getting ready for the short boat ride. Life jackets are available.
**Camera man balancing act...
Bako National Park -happy faces on the boat- WireBliss
The happy faces!!
The boys' first boat ride.
View of Mount Santubong On the way to Bako NP - WireBliss
View of the Bako River Mouth and Mount Santubong.
Bako National Park -just arrived- WireBliss
Here we are, the Park's Head Quarter

The Forest Lodge and Other Facilities
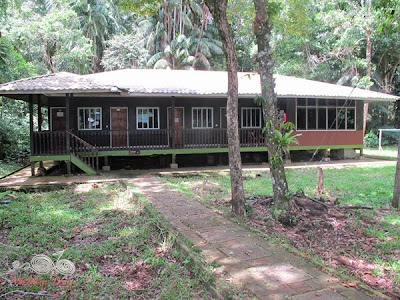
We checked in to a two-bedroom Forest Lodge for the night stay.
Forest Lodge Type 4 at Bako NP - WireBliss
Our Forest Lodge, Type 4, 2 bedrooms.
A bit old and run down.
The wooden floor makes lots of noise as you walk.
Wooden planks on the way to the lodge
A short (5 minutes) plank walk to our Forest Lodge.
Forest Lodge Type 4 at Bako NP - WireBliss
Our room, three beds and a wardrobe.
Keep all windows and doors closed at all time to avoid unwanted guests.
Forest Lodge Type 4 at Bako NP - WireBliss
Bathroom and toilet. Reasonable. Water piped from the city.
Without hot water of course.
Forest Lodge at Bako NP - WireBliss
This are the other type of Forest Lodge - bigger.
Forest Lodge at Bako NP - WireBliss
Chalets in the jungle.
Forest Lodge Type 4 at Bako NP - WireBliss
A newer Forest Lodge Type 4 which is closer to the head quarter.
Jetty at Bako NP - WireBliss
During high tide, boats can take you to this jetty.
Otherwise, we disembark at the beach, at knee deep water.
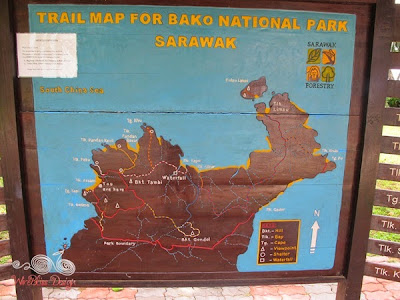
Bako NP Map and Trails - WireBliss
Trail Map for visitors to plan for your walk.
Bako NP Map and Trails - WireBliss
More details on the trails and the amount of time required for each trail.
The Beach
Not many people at the beach the next morning.
The boys don't dare to go to deeper water, so they just play at knee deep water for a little while.
Me, I prefer to stay dry, under the shade and be the camera woman :)
Some nice scenery from beach.
Bako National Park Beach - WireBliss
The only other group of people at the other end of the beach.
Bako National Park Beach - WireBliss
Sandy but slightly murky water.
Bako National Park Beach - WireBliss
Look at the boys!
They are just standing there and looking. Hai yai yai.....
To be continued....

Wednesday, June 25, 2014

4 Wire Wrapping Supplies That You Need to Get Started

Have you recently found your passion for wire wrap jewelry?
If you have lot of free time in your hands, try making some wire wrapping jewelry and create some unique one of a kind wire wrapped earrings, bracelets and rings that nobody has.
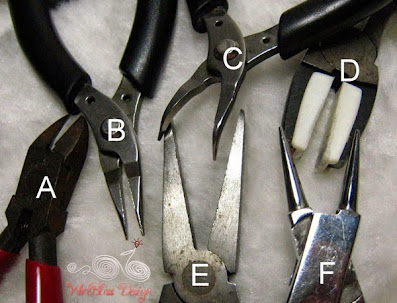
Before you get started, apart from the wire, the four basic types of pliers that you will need for a start are as follows:
  1. Wire cutter ('A' on the picture below): It is an essential supply for making wire wrap jewelry. This cutter allows you to cut and trim the wire of desired length. Buy the best quality cutter pliers to get neat edges to make professional looking jewelry.
  2. Chain nose ('B'): It is similar to the round nose pliers but here the inner edges of the jaws are flat. Thus, they are used for providing better grip and closing and opening the jump rings. This plier narrows towards the tip that makes them valuable to get into small space, like tuck in the wire end. To get perfection, ensure that the pliers’ inside edges are not serrated or else there will be mark on your wire. 
  3. Flat Nose ('E'): It is useful for bending and straightening the wire. This tool is used for a number of tasks when making earrings, bracelets, and pendants as it helps in holding the wire piece securely.
  4. Round Nose ('F'): For me, they are an absolute must to get control of the wire when you make loops of any size. They are even needed to make the spirals. To get large loops it is suggested to place the wire near the pliers’ handles and for making the smaller loops, place the wire at the pliers’ tip. Buy good quality pliers that have a return spring mechanism in the handle to ease the task as neat loops are an absolute must to make professional looking jewelry.
Wire wrap jewelry essential tools by WireBliss

These four supplies are not all; you also need a good instruction manual, book, magazine, ebook or search online for free tutorials that gives step-by-step instructions to make trendy and unique wire wrapping jewelry. There are many craft supply online stores that have a good collection of supplies to make wire wrap jewelry. But remember to look for coupons at Frugaa.com to the things at affordable prices.

Friday, June 13, 2014

Happy Father's Day 2014

It is rather last minute.
Father's Day is just around the corner.
Was looking at the following and wondering if I should or should not.
I don't mind the camera for myself though - belated Mother's Day...hehe.
The father/fathers would be very happy with any of these :)

A movie would be good.
Everyone can enjoy together.

This one is good if we were two weeks earlier.
But there will more to come :)

So, there goes.
Whatever it is, Happy Father's Day to all the Dads in the whole wide world.

Sunday, June 08, 2014

One of the Bazaars of Sarawak - Siniawan Bazaar

As usual, I am a bit behind in posting. We stopped by this place known as Siniawan Bazaar last March.
There are many similar Bazaars in Sarawak. Siniawan is an example of the early Sarawak towns where time seems to stand still.

I find it very interesting to explore these Bazaars. Interesting because sometimes, you'd find some very interesting items in the shops which you wouldn't find in the city or other places :).
Unfortunately, most shops were closed when we were there.

Anyway, do enjoy the pics.
Siniawan Bazaar Wooden Shophouses
Made up of two rows of two storeys wooden shophouses.
Siniawan Bazaar Wooden Shophouses
The main street decorated with red lanterns and flowers.
Siniawan Bazaar Homestay
Siniawan Homestay, coffee shop on the groundfloor.
Siniawan Bazaar Vegetable stall
Only few shops were open that day, including this vegetable shop.
Siniawan Bazaar Decorated Five Foot Way
Well kept and decorated five foot way - pretty.
Siniawan Bazaar Vegetable Stall too
Just an interesting nostalgic little wooden shop.
Siniawan Bazaar Sg Sarawak Kanan
Siniawan is located at the bank of Sarawak Kanan River.
On the opposite side is a village.
Pay the boatman to bring you across - there is no bridge.
Siniawan Bazaar as you enter from the main road
Other than that, you can reach Siniawan by road.
Kuching -Bau Road
Kuching - Bau Road
Siniawan Bazaar at Night
Every Friday and Saturday night, Siniawan Night Market would be on.
We were there during the day,
so I only managed to snap picture of the advertisement...hehe
Looking forward to explore more of these bazaars in future.

Friday, May 16, 2014

Wire Jewelry - Sparkly Swarovski Crystal Bracelets

The last four weeks were craaaazy pack.
Firstly, I was "forced" to attend a two weeks audit training and exam which actually was a 3 weeks program because the one week "off" in between was actually spent compiling the audit report.
My hesitation (that's why felt "forced") about attending the training was because of the "exam" at the end of the training.
I am soooooo terrified of "exam"!!!
In the end, I actually enjoyed the training, learned lots of things and made some friends.

Now, waiting for the exam result - I am hoping for the best.
Also, busy catching up with the last 3 weeks work.
Duh!!

That aside, I hope to embark on more wire jewelry projects this weekend - finishing off commissioned pieces and maybe write a new tutorial....mmmmm.....if I have the time.
Anyway, here's sharing my most recent sparkly Swarovski Crystal (4 mm - yeah tiny) bracelets completed early April but only managed to post now.
All wire wrapped with 24 gauge wire.

Wire Wrapped Swarovski Crystal Bracelets

Wire Wrapped Swarovski Crystal Bracelets

Wire Wrapped Swarovski Crystal Bracelet by WireBliss

Wire Wrapped Swarovski Crystal Bracelet around my wrist

Looks good with lots of them together.
Have a great weekend and happy wrapping.

Wednesday, April 16, 2014

Wire Jewelry - Wire Wrapped Pearl Studs


Made a couple of these simple wire wrapped studs the other day. All of them are pearl studs of different sizes, shapes and colors.

If you'd like to make them yourself, which would take about 30 minutes or less of your time (for a pair), you can find the tutorial here:
At Etsy, click *here*
At Craftsy, click *here*
Wire wrapped pearl stud earrings by Wirebliss - teardrop shape
The oblong/teardrop shape pearls really look pretty with this wrap.
Wire wrapped blue pearl stud by Wirebliss, modified
A bit of modification to the top of the earring - added a small loop.
Wire wrapped stud earrings by Wirebliss on DIY Earring cards
On the DIY Earring Cards.
Wire wrapped blue pearls stud earrings by Wirebliss

Wire wrapped stud earrings by Wirebliss on earring cards DIY
Another look before going into the box.
Wire wrapped stud earrings by Wirebliss ready to pack and ship
Ready to ship :) - Actually already shipped

Thursday, April 10, 2014

DIY Earring Cards

The idea started long time ago but it didn't materialise until recently. I kind of procrastinated over it and just can't decide on the design. Same as my DIY Light Box previously.

Was thinking if I keep doing this (the procrastinating part - I do this a lot!), it will never going to happen. The other day I got a bunch of order for stud earrings (post about them later) and decided to create this earring cards once and for all. It is not final as I am forever changing the layout and design in my head but good enough for now.

What do you think of my DIY Earring Cards?
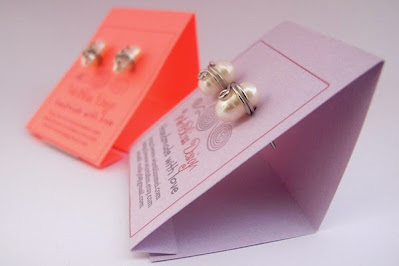
DIY Earring Cards by WireBliss
WireBliss logo in front together with websites and email address.
The white patch at the center of the purple card is double sided tape.
You can use stapler as well.
Here is the process involved.
I use Microsoft Word to create my cards as I am most familiar with it - use it everyday!
Alternatively, you can also use Power Point, Excel, Google doc, etc. etc. whichever you are familiar with. 
So, here goes:
  • Create an image/design (jpeg file or any picture file) that you'd like to place at the front of your earring card. If you don't have one, you can leave it blank - which means you can skip this step.
  • Since I have my logo in jpeg, I use that and added my website address below it.
  • In a new Word document, create a table (or insert table). 
  • If you do not know how to create table in Word, google or check it out here - create table 
  • Depending on the card size you want, determine the number of column for the table. 
  • Mine is 5 columns and 4 rows (1 column x 4 rows represent 1 card). The purpose of multiple rows is for ease of adjusting the height.
  • In the table, place the cursor at the spot where you would like to insert the image. Click on insert image, and look for the image you'd like to insert.
  • Make adjustment to the column width and row height till you have your desired earring card size, print it out on a piece of thick paper (100 gm).
  • I make the table borders visible so that I know where to cut and fold later on.
  • Cut the cards along the borders as shown below.
  • Use a needle to make 2 holes on each card and you are done.
Here is how my earring cards looks like + the measurement just to give you the idea - click on the pic to enlarge.
If you have other ways of making earring cards, do share or leave me a comment.
If you have suggestions or questions, do email or leave your comment here too.
DIY Earring Cards by WireBliss


DIY Earring Cards by WireBliss
Side view
That's all for today.